Have you fucked around with acetone vapor smoothing at all? You can get a great looking finish that way.
Neat, thanks for the tip!
I can put up on shapeways, out of town at the moment so won’t get to it for a couple of days.
I should also put it on thingaverse so folks can download at will and print on their own.
Thanks again for making and sharing the file. One material that one of the online print services offered was a nylon filled with aluminum powder to add a metallic quality. I would of done that if it weren’t for the price.
These 3d printed rack parts have had me thinking about a project that I’ve been putting off until yesterday:
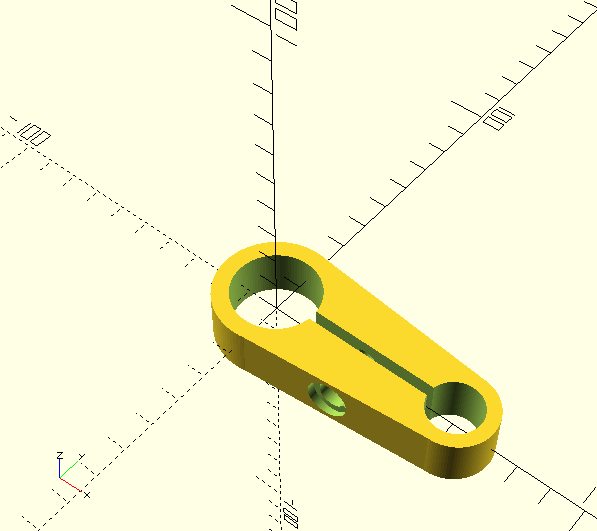
It’s a decaleur rod clamp - you’d print two and add a carbon fiber or aluminum rod, and they clamp with a seatpost bolt.
The reason I’ve been putting it off is because it’s an OpenSCAD model, which means it’s not built with standard modeling software but coded from a geometric CAD programming language. And here’s the fun part - since it’s code it can be driven off of variables, and those variables can be modified using the Thingiverse Customizer so anyone can generate a printable design with the right dimensions.
So here’s the part (the thumbnail hasn’t generated yet): https://www.thingiverse.com/thing:2950402
If you click on Customizer on the right hand side (I think you need an account ), you’ll see a preview of the part with a bunch of sliders on the left.
You can change the bar size between 25.4, 26.0, and 31.8 mm.
You can adjust the length between the rod and the handlebar to whatever you need.
You can change the rod size between the Ortlieb sizes of 16, 12, 10, and 8 mm.
Then you can generate a custom STL to download and print.
The design is still rough so I don’t suggest printing one unless you have a printer and want to help me fine tune the design. I still need to figure out the hole tolerances and clean up the design a little before getting to a design worth printing for testing.
Supwife and I took a sewing class and Im hella into it. (we made canvas tote bags)
Im gonna make an ultralight roll top daypack as my next project. I know we got a lot of crafty bag-makers here, ya’ll got any resources to help me plan shape/corner types/number of pieces/straps? I have a bunch of ideas already, and could conceivably just clone my REI Flash, but am into the design aspect too and would love to read up on different styles.
also the myog subreddit is a pretty good resource.
drwelby, that’s really cool- I didn’t know you could code parametric models in a way an end user could modify for their needs and still retain certain fixed tolerances.
Very awesome, thanks for sharing
[quote=Todd]Supwife and I took a sewing class and Im hella into it. (we made canvas tote bags)
Im gonna make an ultralight roll top daypack as my next project. I know we got a lot of crafty bag-makers here, ya’ll got any resources to help me plan shape/corner types/number of pieces/straps? I have a bunch of ideas already, and could conceivably just clone my REI Flash, but am into the design aspect too and would love to read up on different styles.[/quote]
Other resources:
Backpacking Light MYOG Forum
Dave Chenault blog posts on MYOG
Thanks for the links folks.
In terms of basic construction, can someone confirm my understanding, or set me straight.
Im planning on constructing it out of two panels.
In terms of order of sewing shit, I need to attach all outside pockets and do dads, including straps, before I sew the actual bag up.
But other then that, there are no tricky surprises to the order that I should sew things in?
Person at the sewing shop yesterday had me questioning my own sense of logic.
I’ve never made an UL pack before, I make messenger bags and backpacks. But the very last thing you do is sew up the body and the top trim. Everything else is on the body already. I am making a flaptop bag today, I’ll see if I can take a few process photos to give you an idea.

Got the library to print a test print of my customizable decaleur. Need to add some bore tolerances to the model but overall the design feels about right.
That’s neat!
Curious to see how well it holds at each end. It seems like you’d want most of the clamping force on the handlebar side
[quote=Lowrey’sOrgan]
Curious to see how well it holds at each end. It seems like you’d want most of the clamping force on the handlebar side[/quote]
I’m not sure how much it even needs to hold (all my bags have stiffeners on the back), but that’s a good point. Right now the clamping bolt is halfway between the bore centers, but it really could just be a fixed offset from the handlebar end.
tarcksourcing
(that print isn’t functional anyway because the library doesn’t calibrate their printer for the filament width so the bores are all 0.7mm undersize)
dubs
Wondering if you could use a detail like this to make it slip over an existing handlebar, or if you’d lose too much clamping force:

monoprice seems like they are blowing up the cheap 3d printer market. They have a $500 photo 3d printer that looks neat. And a $150 .05mm resolution printer.
I wish I had any use for them or knew 3D.
Also the investment casting opportunities seem really great.
Hey, if anyone want to retrofit an old feedbag with one of those fancy new cord locks that Revelate uses:

Or search “FMS Cyberian Cord Lock”
oh sick. I might order 100. (not from ebay because the price per on that ebay is garbage at 100)