Such a long hose will definitely soften up the brakes.
It should still be pretty darn good. I never have luck on the first bleed on a fresh hose. Usually takes 2 tries to get it solid.
Yeah, took two or threee on my trp to get feeling good.
At snowshoe joe park this weekend. 1st run is blue jump trail. Landed a lot and felt good.
2nd run, make it about a few hundred feet when rear tire blew off the rim on a straight. I just pushed it back on, started pumping it up and it blows again. The. I realize something is wrong with bead. This dh casing was a beast to mount the first time. It should. Or go on this easily.
Only had the. For a week. Fucking tires are expensive at real people cost. It dude mounted another dhr dh for me. Sorry phone tarcking and spinning wheel holding bike and camera was tougher than I I thought it’d be.
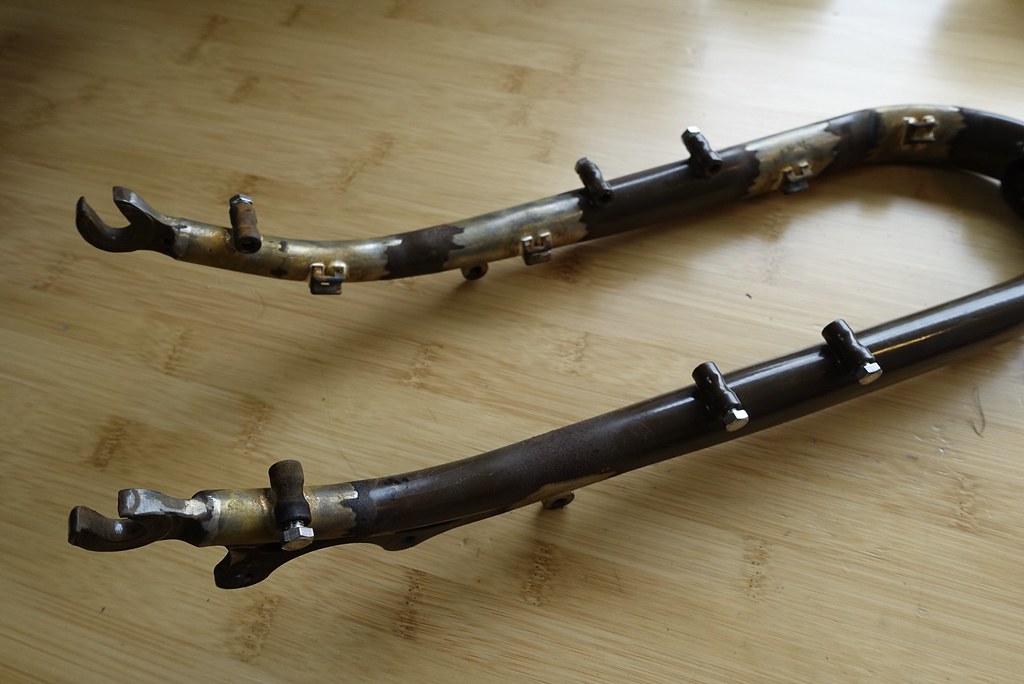
[quote=Andrew_Squirrel]Cyclefab / Haulin Colin / Dan Boxer finished up all of the braze-ons last week and I dropped the brown Elephant NFE off at Seattle Powdercoat yesterday.
Frame Modifications:
- QTY 1: New rear hose guide (zip-tie style) on bottom of NDS seat-stay.
- QTY 1: Add one barrel rear light mount halfway up NDS seat-stay
- QTY 3: Remove DT/CS hose guide braze-ons
Fork Modifications:
- Dynamo Wire management. QTY 4 External dynamo wiring guides up fork leg.
- Fix Tubus Duo Lowrider collisions with quick release skewer nuts and level out rack in the process. Tubus Duo Lowrider rack modification, remove tab. Remove QTY 4 rack eyelets around dropout, add QTY 2 barrel braze-ons up fork leg.
- Add QTY 2 fender eyelets halfway up fork leg away from rack and disc caliper.
Cyclefab Porteur Rack Modifications:
- Remove light mount, add permanent drop bracket with tapped hole.
- Dynamo wire guides up driveside rack stay. QTY 2
Album here: https://www.flickr.com/photos/andy_squirrel/albums/72157669269133038
 [/quote]
i want an NFE or a hunter gatherer. I have 0 need. fml
I made a decaleur thing for day/ruiner. Planning on putting some miles on it before doing finish work on the stays (radiusing the ends, painting them black, loctite, etc).


We set the sag on my lady’s new sus fork. Wow the pressure was almost double what it should have been. I knew it was too high but not that high. Bike is going to feel completely different now.
[quote=puelnewdle]I made a decaleur thing for day/ruiner. Planning on putting some miles on it before doing finish work on the stays (radiusing the ends, painting them black, loctite, etc).
[/quote]
Nice! is that fork spacer piece DIY or off-the-shelf?
Also, holy hell that’s a tall bag! Is that a custom size?
[quote=dotMR][quote=puelnewdle]I made a decaleur thing for day/ruiner. Planning on putting some miles on it before doing finish work on the stays (radiusing the ends, painting them black, loctite, etc).
[/quote]
Nice! is that fork spacer piece DIY or off-the-shelf?
Also, holy hell that’s a tall bag! Is that a custom size?[/quote]
Off-the-shelf Axiom seat collar with the inner lip ground down (so it’s all 28.6mm):
Not a custom bag, just a plain old ordinary large Ozette bag.
too many things…
stripped coffee grinder to the frame
Had the drive train washed
frame saved it
re built
did cable and housing
replaced rear wet dick tube
bled brake
tried to wrap bars but the shitty bar tape didn’t like to be stretched real tight.
also put new tires on and set them up.
for real, spent more time getting the fucking seat collar back on than bleeding the brake. I had to heat it up to 350 and hit it with a hammer to get it on all the way.
Cut and mounted a DIY dyno mount + wired front and rear lights on HG,
fiddled with the rear tire to get it to hold air.
Put a new tire on my MTB and sealed it all up.
If you invert a can or air duster you can use that to cool the other mating part for maximum thermal tolerancing. Currently making more wing to body attachments with -0.0000/+.0006 tolerance on the ID bores for bushings that require liquid nitrogen to be installed. For a seat tube though you could probably also use a hose clamp to pre load the interface area.
Got the Sundeal late today, so it’s barely running. It’s heavy as hell, but by far the worst part on it is the Amazon chair pole I put on there which either tips the saddle way too high or way too low. Can’t wait to get the front brake set and try it out. Looks like a 2.1 Powerblock should clear.
The rear brake caliper posts were crooked and too short on mine. Had to use some conical washers to get it even marginally close. Everything else was fine, I guess rear brake housing could be a tad longer too.
Rear is fine so far. This is my first disc bike (lol) and I didn’t realize how much the lever needed to be “pre-engaged” before setting the front caliper. Pretty sure those mounts are off but it mostly doesn’t rub.
That’s a clever idea.
Update:
Threw out the crappy tape and the shop I stopped at magically had caliedo tape in stock. Subtly TAF till death.
Yeah wow those disc posts on the Sundeal fork are way off. I moved the washers under the caliper to get it running in the meantime though. That bike is a lot of fun.


Put some basketbars and a boner stem on the Sundeal last night, which lead to needing longer brake cables, which lead to using my stash of compressionless jagwire cables, which lead to replacing the brakes with parts bin BB7s.
Now just need to figure out what’s causing what I think is the rear rotor to rub when I’m on it. There’s no rubbing when the wheel is spinning without a load on it. Happened with the original brakes too.
The brake posts on my fork are pretty off as well.
Loose hub? It’s always a good idea to overhaul cheap hubs anyways. Grease is cheap, but it seems most hub manufacturers are cheaper.
I’m hoping it’s that simple. Ran out of time to mess with it last night, won’t have much time tonight either, but wanting to multimodal it to work on Friday.